Switched Male infant booty narrative Welcome to your location, ladies. If you are expecting a baby boy like me in the near future, this topic will go very well. The construction of a baby doll is not much different from a normal boot. Only color harmony and in some ornaments the baby doll and the baby doll are different. You can use it in the boys’ bootie making, not in the same fancy dolls by using and modifying the measurements I will give you below.
In your day you are very Easy female boot I shared the topic. I published her narrative in detail accompanying her paintings. Now I hope I will pass on to this easy male boot construction part for our baby.
Expression is simple to explain to the ladies who will start a new patio who does not know any knitting for the first time. Links to the knitting techniques required to make the paw are given.
We are the materials necessary for male baby booties.
The rope you want (we chose the cotton rope)
We have number 2,5
Scissors
2 pcs buttons
Needle rope
Auxiliary apparatus
This crochet knitting techniques that should be known for boy baby booties
Chain pull
Needle construction
Single railing construction
Crochet stitch execution technique
Age: Our dog is 0-3 years old.
Construction Challenge: 5 over 2
Explanation of male baby booties
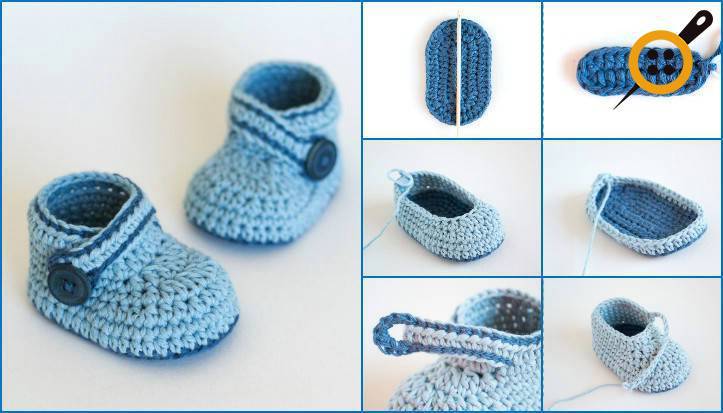
If you are bigger than 0-3 for the month, you need to increase the number of chains. Now we have 9 chains. Let 1 chain the back of this base and pin a total of 5 units in the same hole. Let’s go to the end of my chain to make a needle every time I hit each hole. Let’s go to the end of chain by 5 number of pieces in the last chain and make 1 pieces in each hole again. There are those of you who have never done before, so we turn around the 9 chain we first took. The appearance of this sequence will be as shown in the picture
Now that we’ve arrived 2 is not available. In this section we also use our frequent needle technique. Now we are at the point where we have made an increase. As you know, we increase the number of stitches 5 to 2 so that each hole gets incremented by 5 times with the condition of 10 to get the number of stitches XNUMX.
We do not increase the other sides as well, and we continue to sink each hole to 1 times until the increase zone on the other side. We increase the number of stitches 5 in the incremental area by 10 and complete the remaining part with the needle frequently. The picture of every narrative is upstairs to be a guide.
Now we are in the incremental zone 1 erasing 2 number of times we will need to do the next step 1 increment (same 2 times sinking)
If you do not have a helper ring, you know the rope in the beginning. Beginning friends are often needles, so they know how to mix head and tail.
Now we have places that matter. Since we prefer the heel part as the starting point in our paddle, take the place where we made the increase in the base part as much as the front part. Even when placing the base of the recommendation, place the guide rope or knitting aid apparatus on those increments.
This time we will be reducing when we get to the needle-making augmentation section, with each hole drilled 1 times until the augmentation section at the base. We will cut each hole together with our side next to each other so we will not get a 2 thread until the end of the increase Single handrail We will.
For the neck part of the neck we start with the 11 or 17 button marked up on the construction of our needles. Turn the wrist part with the needle frequently without making an increment. 12. And 16. Cross the loops with a needle.
Repeat the same procedure in the top row and this time 12. Shoot the chain 12 when we are in the loop.
Which will form part of our ankle joint. 4 chain and pull more 5. Sink into the hole. This is where we will be looping back to the sink by sinking into every hole with the needle frequently.
Now the patty is almost over. For decoration Stitch execution technique Let’s use our different colors to embellish our loops over our traditional decorations.
One of the foxes in the making of a baby bootie is over. When you come to the weft section while using the other piece, use the opposite side so that your wastes do not stay on the same side of your booties.
As you can see, a weave pattern is the end of our narrative. Do not forget to follow it from our Bzi social media accounts.
This baby boy was made by the booty-made babe’s Ciciler Örgü page.
You wrote the plot but I do not know how to knit. For beginners Knitting techniques And you can look at our knitting lessons page. If you want to order, please let us know. or Our Facebook Page You can order us comfortably.


.jpeg&w=360&h=205&q=60&zc=2&cc=000000 "Labrador Gives Birth To One Of The Biggest Litters In History For The Breed")


.jpg&w=360&h=205&q=60&zc=2&cc=000000 "40 Cute, Scary and Weird Australian Animals You'll See for the First Time")